Ansible playbook for Kubernetes cluster installation on Linux
Dear Techies,
Kubernetes has become the go-to solution for orchestrating containerized applications, making it easier to manage, scale, and deploy services. However, setting up a Kubernetes cluster manually can be a daunting task. Fortunately, Ansible can simplify this process significantly. In this blog, I'll guide you through an Ansible playbook that automates the installation and configuration of a Kubernetes cluster on Linux, featuring both single control plane and High Availability (HA) control plane setups with multiple worker nodes for development and testing environments.
While Kubespray provides extensive features and customization options, this playbook remains lightweight and simple, making it an ideal choice for quickly setting up a development or testing Kubernetes environment on Linux.
GitHub Public Repository: install-k8s-on-linux
You can find the complete step-by-step guide in the README section of the repository itself, and I will also be providing the same in this blog.
This Ansible playbook automates the installation and configuration of a Kubernetes cluster on Linux, supporting both single control plane and HA control plane setups, using the latest stable Kubernetes release.
- RedHat-based ( Fedora, RHEL, Rocky Linux, Almalinux, Oracle Linux )
- Debian-based ( Debian, Ubuntu )
- SUSE-based ( OpenSUSE, SLES )
Prerequisites:
- Please install Ansible on the machine where you plan to run the playbook if you haven't done so already.
- Prepare the cluster nodes by installing any of the above mentioned supported Linux distributions, even with a minimal installation.
- Please ensure that you have DNS set up that resolves all the involved hosts, or update the host files on all hosts with the necessary entries for each involved host.
- Create a common Linux user on all cluster nodes, which will be used for the cluster installation.
- Enable passwordless SSH authentication from the Ansible host to all cluster nodes using the common user created earlier.
- Ensure the common user has passwordless sudo privileges on all cluster nodes.
- For HA cluster setups: Ensure that the control plane endpoint is configured via a load balancer such as NGINX, HAProxy, or any load balancer of your choice.
The main playbook installs and configures the latest stable versions of the following required components:
- Container orchestrator: kubernetes
- Container runtime: containerd
- Low-level container runtime: runc ( dependency for containerd )
- CNI plugin: calico
Optional playbooks are available to install the following components once the cluster is ready:
- csi-driver-nfs
- csi-driver-smb
- MetalLB LoadBalancer
Step-by-Step Workflow
Step 1: Copy and execute the below command snippet to extract the tarball for the most recent stable release of this Ansible project from GitHub.
curl -sSL https://github.com/Muthukumar-Subramaniam/install-k8s-on-linux/releases/latest/download/inst-k8s-ansible.tar.gz | tar -xzvf - && cd inst-k8s-ansible
Step 2: Update the host-control-plane file with the necessary hostnames.
Important Note: Use a single control plane node for a single control plane setup. For HA cluster setups, ensure a minimum of 3 control plane nodes, and always use an odd number of nodes.
Single Control Plane Setup
Example:

HA Control Plane Setup (NEW!)
For high availability, configure multiple control plane nodes (minimum 3, always use odd numbers):

Example of HA Control Plane configuration with 3 nodes
Additional Step for HA Control Plane Setup
Update the file control-plane-endpoint with the endpoint behind the load balancer that has all the control planes in the backend pool.
Port configuration:
- If only
<FQDN of control-plane-endpoint>is provided, the default port6443will be used.
- Alternatively, provide a specific port as
<FQDN of control-plane-endpoint>:<port-number>.
Step 3: Update the host-workers file with the necessary hostnames.
Example:

Step 4: Update the pod-network-cidr file with the desired pod network CIDR.
Example:

Important notes on the pod network CIDR:
- Only private IP addresses, as defined in RFC 1918, are allowed.
- The deployment is configured to accept CIDR prefixes exclusively within the /16 to /28 range.
- Ensure that the selected CIDR prefix does not conflict with any existing networks in your infrastructure.
- Choose a CIDR prefix that provides sufficient address space for your cluster.
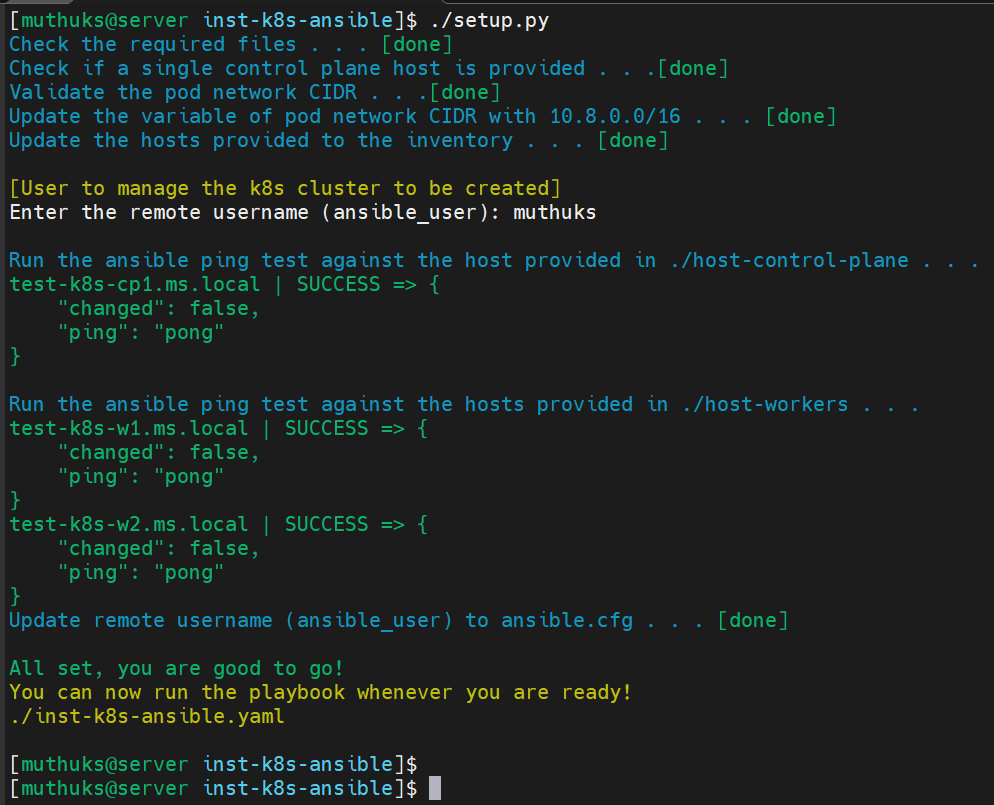
Step 5: Run the setup.py script to prepare the environment for the Ansible playbook.
./setup.py
Sample Run:
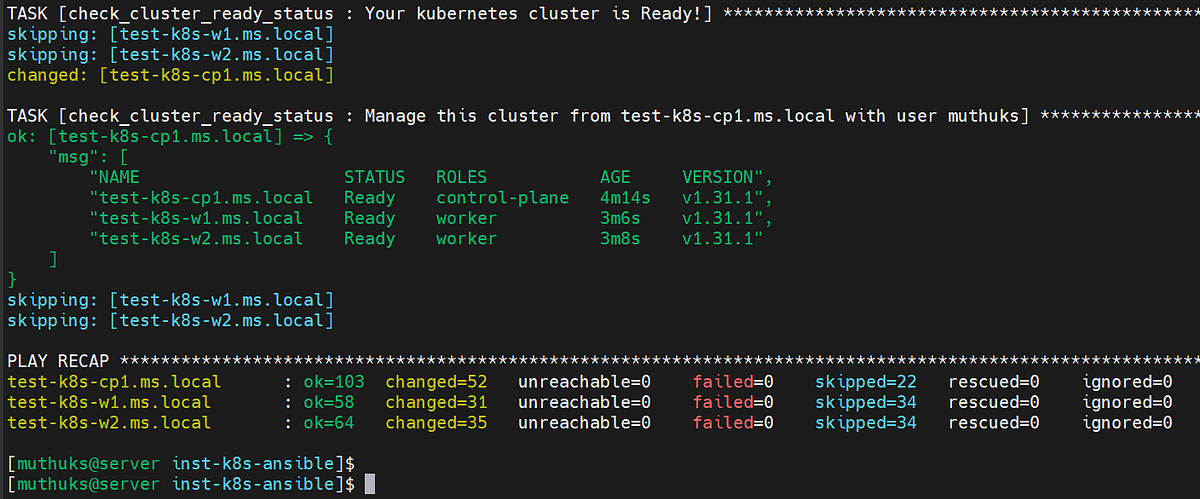
Step 6: Run the playbook if the setup.py script completes successfully.
./inst-k8s-ansible.yaml
Expected Outcome:
Great work! Your cluster is now ready to use.
Optional Steps
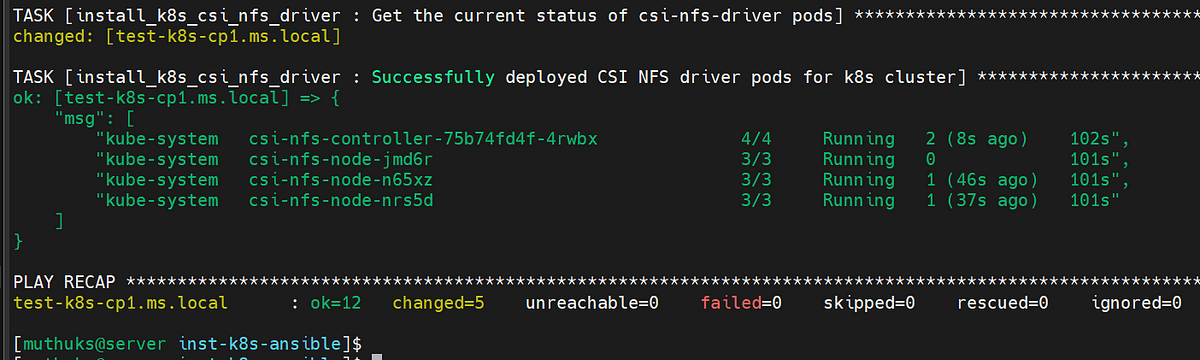
Optional Step 1: To install CSI NFS Driver for the kubernetes cluster if required.
./optional-k8s-csi-nfs-driver.yaml
Expected Outcome:
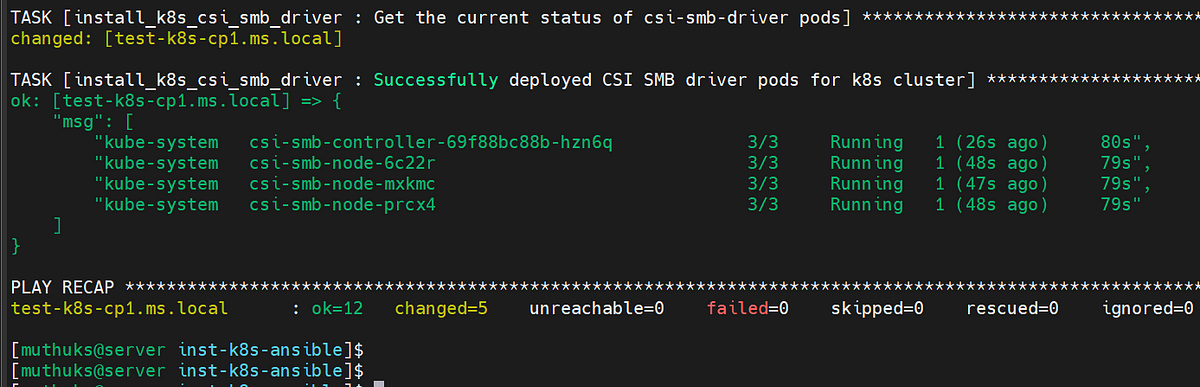
Optional Step 2: To install CSI SMB Driver for the kubernetes cluster if required.
./optional-k8s-csi-smb-driver.yaml
Expected Outcome:
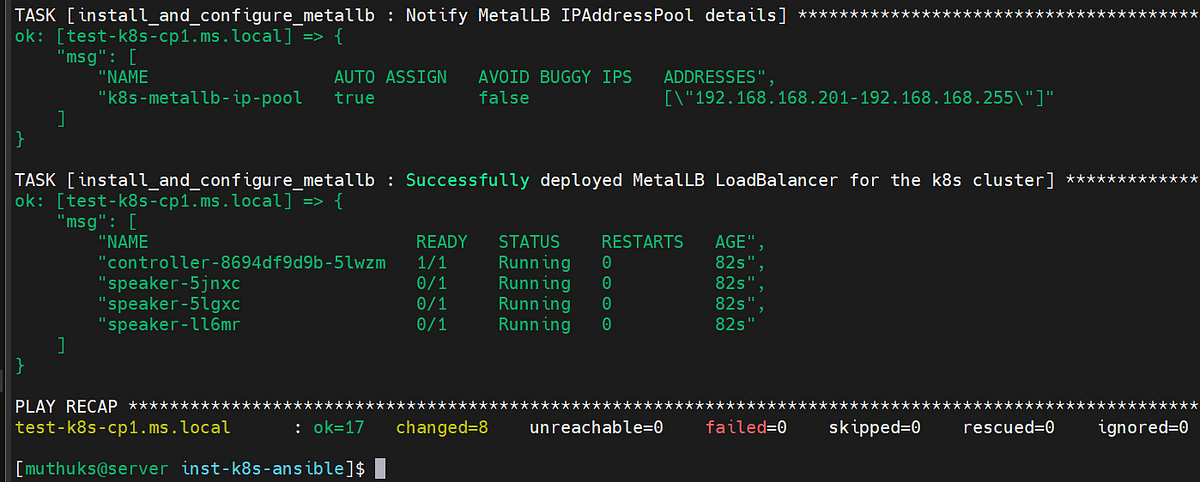
Optional Step 3: To install MetalLB loadbalancer for the kubernetes cluster if required.
Note: Please make sure to change the address pool range in the playbook as per your environment and requirement.
Example:
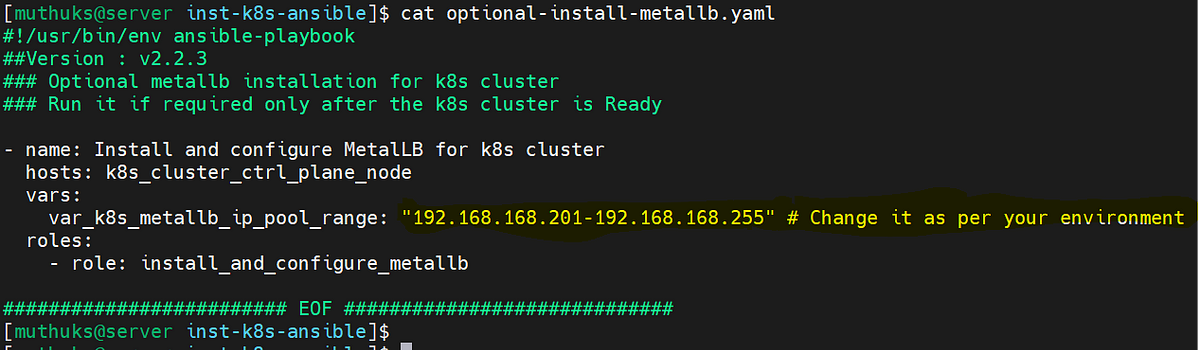
./optional-install-metallb.yaml
Expected Outcome:
That's all for now! Your trust and engagement means a lot, and we hope you find the playbook useful.
Kindly note:
- This playbook is a useful resource for experimenting with Kubernetes and can be customized to meet your specific requirements.
- The playbook utilizes the GitHub API to fetch the current stable versions of all required software components.
- Compatible with a wide range of Linux distributions.
- Your feedback and contributions are invaluable to the success of this project.
- Please report any bugs, suggest new features, or contribute directly to the codebase.
If you find this GitHub project install-k8s-on-linux useful, kindly leave a star.
If you find this post useful, please follow me on GitHub at My GitHub Profile.
Have lots of fun!
Comments
Post a Comment